 Main features:
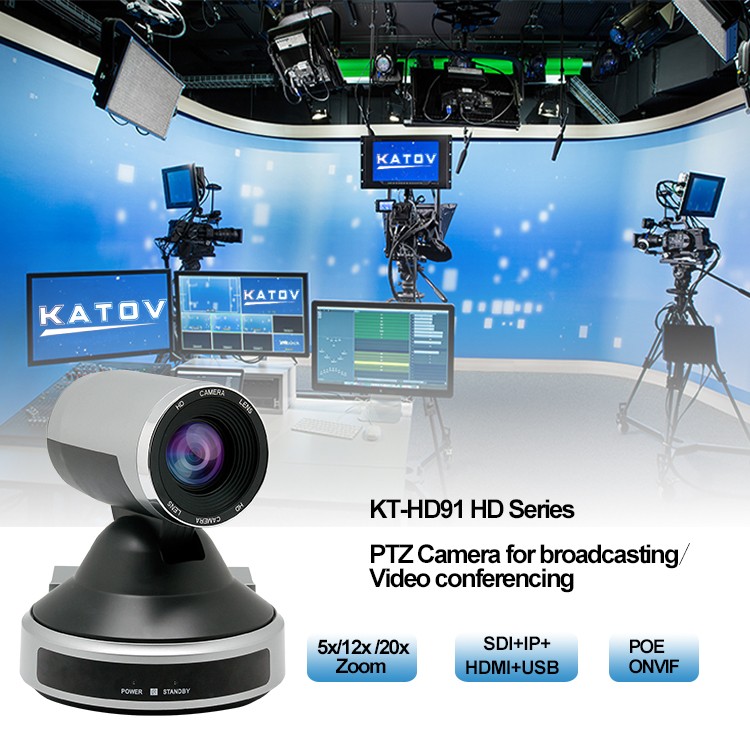
5X/12X/20X optical zoom can be chose ,3.1~8.5Megapixels
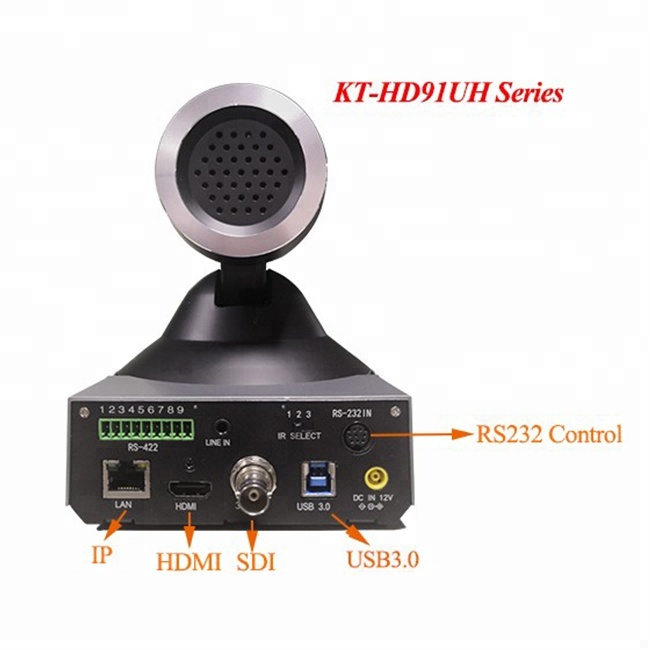
HDMI,3G-SDI, USB3.0,IP outputs,UVC control, POE optional
Support H264/H.265 ,MJPEG compression enabling,full hd video stream over RTSP,TCP/IP,HTTP.
Support IR remote control, RS232/485 serial controls
Support VISCA and Pelco P/D protocol
9 preset positions by Visca, 200 preset positions by Pelco
Support desktop Tripod, Pole and ceiling mount
video conference camera church use broadcasting PTZ camera IP camera full hd video conference camera 91R Main features: 5X/12X/20X optical zoom can be chose ,3.1~8.5Megapixels HDMI,3G-SDI, USB3.0,IP outputs,UVC control, POE optional Support H264/H.265 ,MJPEG compression enabling,full hd video stream over RTSP,TCP/IP,HTTP. Support IR remote control, RS232/485 serial controls Support VISCA and Pelco P/D protocol 9 preset positions by Visca, 200 preset positions by Pelco Support desktop Tripod, Pole and ceiling mount Main application: Video conferencing cameras KT-HD91 is widely used in video conferencing, remote education, remote medical, church, accident, court, multimedia, chain store, transportation, airport and other monitor area. Camera KT-HD91YL KT-HD91RL KT-HD91AL Image Sensor 1/2.5″ Image Sensor Effective Pixels 3.10 Megapixels 3.10 Megapixels 3.50 Megapixels Resolution 1080p60/50, 1080i60/50, 1080p30/25 Signal System PAL/NTSC Lens 5X optical zoom f=3.2mm(wide)~14.4 mm(far end) F2~F2.8 12X optical zoom f=3.9mm(wide)~46.8mm (far end) F1.8~F2.8 20X optical zoom f=4.7mm(wide)~94.0 mm(far end) F1.6~F2.8 Horizontal View Angle 84.5°(W)~23.9°(T) 72.5°(W)~6.55°(T) 60.9°(W)~3.2°(T) Pan 355°(max. speed:80°/s) Tilt -30° to +90° (max. speed: 60°/s) Focus System Auto/Manual S/N Ratio ≥50db Preset Position 9 preset positions by IR remote controller, 255 preset positions by Keyboard or PC Minimum Illumination 0.1Lux Exposure Control Auto/Manual/Priority AE/Exposure Compensation/Bright Shutter Speed 1/1~1/10,000s Gain Auto/Manual White Balance Auto/Manual/ATW/One-click/Indoor/Outdoor Image Effect Full color/black and white/Electronic flip Video Output HD HDMI, SDI,USB3.0, IP Other Output Line In Control Protocol SONY VISCA, PELCO P/D Control Mode RS-232C, RS-422/485 Power 12V DC(10.8~13.0V DC) Power Consumption Max. 30W(DC 12V) Operating Temperature 0~40℃ Storage Temperature -20-60℃ Camera Dimensions (L)147 ×(W)147 ×(H)165 mm Weight 870 g Color Black Accessories DC 12V power adapter, IR Remote, Operation manual, RS-232C Cable,HDMI cable, USB Cable , Ceiling bracket Carton Each camera in a small carton, then 4pcs packaged in one large carton. Certificate ISO/CE/FCC/ROSH Warranty 3 years Packaging & Shipping Send us your inquiry here Telemedicine video conference camera church use broadcasting PTZ camera IP camera Our Services FAQ 1. Q: Are you Manufacturer or Trading company? We are manufacturer with R & D, production and marketing of video conference camera with more than 15 years experience. 2.Q: What is your leadtime? Sample order within 24 hours after your payment. Mass production within 3-5 days. DHL/Fedex/UPS etc delivery date around 3 days. 3.Q : What’s your main products? Our products include: SD, HD PTZ Video Conference Cameras, HD Monitor Cameras, Economic High Speed Dome Cameras, IR High Speed Dome Cameras, Intelligent High Speed Dome Cameras, Intelligent IP High Speed Dome Cameras, etc. 4.Do you have your own R & D staff ? Yes, our company has the whole technical department, including research and development, structure, product, PE, can respond quickly for customer support needs. 5.Q: How many years of warranty of your products One years on system component parts and unlimited free technical lifetime support. 6.Q: What resolutions do you have for Broadcasting? 1080i59.94 is workable for your Recording and Broadcasting. 7.Q:Does Dual-stream workable for your cameras? Yes, for most of our IP camera, H.264/MJPEG are workable. USB camera is YUY2,MJPEG. UVC control. Company Information KATO VISION CO.,Ltd,as a professional video conference camera manufacturer which established in 2004,Located in Shenzhen,China, Specialize in video conference R&D,OEM/ODM. Our main products in cluding 4K cameras,SD/HD/USB PTZ video conference camera,Keyboard controller,Microphone etc. They are widely used in Meeting,Medical,SKYPE Telecommunication,Tele-education,School,Government,Chruch,Recording and Broadcasting and so on. With Our strong R&D dept,we’ve got many moulds Design Patent. We also have CE,ROHS,FCC,ISO9001 Certificates. contact us KATO VISION CO., LIMITED Contact: Janey.Guo Skype: sales05kato Whatsapp/wechat:86-13652304159 Address:4/F, Block B, Dexinchang Industrial Park, Qingxiang Rd., Longhua district, Shenzhen 518109, China